FREE SHIPPING when you spend $100 (Continental US Only)
|
2 FREE 9″ Cherry Bowls when you spend $300
FREE SHIPPING when you spend $100 (Continental US Only)
|
2 FREE 9″ Maple Bowls when you spend $300
Share this post:
When it comes to creating your own handcrafted wood serving platters, the possibilities are endless. Imagine the satisfaction of crafting a functional piece that also showcases your unique style and creativity. From selecting the perfect wood to adding those final decorative touches, each step in the process holds its own sense of fulfillment. But what truly sets your platter apart is the attention to detail and care you put into every aspect of its creation. Stay tuned to discover the essential tips and techniques that will help you bring your vision to life.
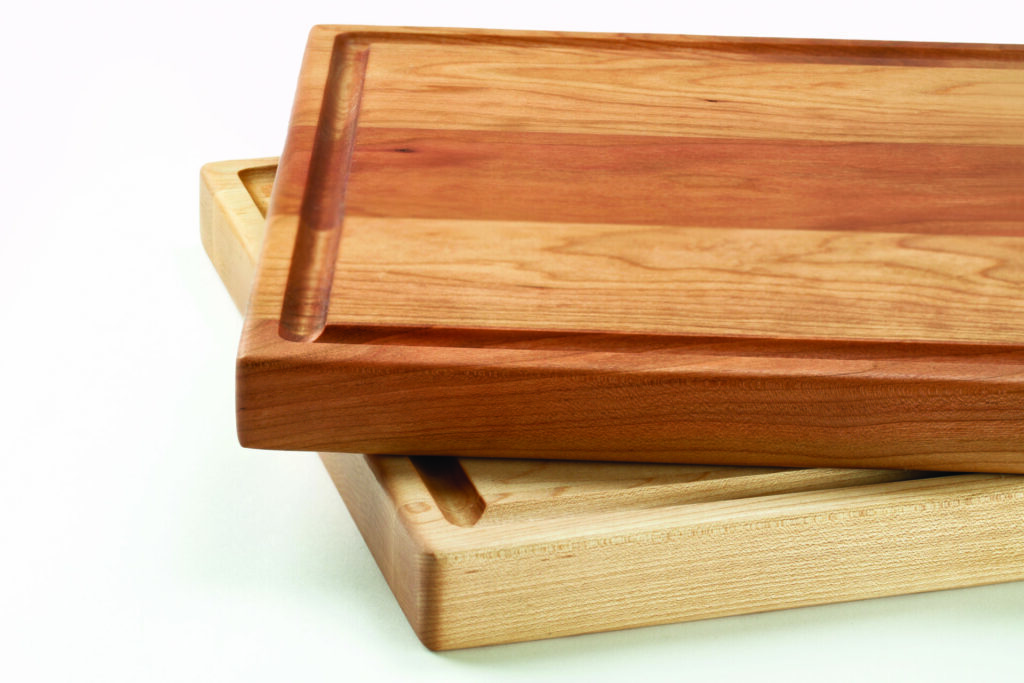
When it comes to handcrafted wood serving platters, selecting the right type of wood is paramount. The choice of wood can greatly impact the aesthetics and functionality of your creation. Different woods possess unique characteristics that can enhance the overall appeal of your serving platter.
Wood characteristics play a significant role in determining the final look and feel of your handcrafted piece. For example, walnut is known for its rich, dark tones and elegant grain patterns, making it a popular choice for those seeking a sophisticated touch. Maple, on the other hand, offers a lighter, more subtle appearance with a fine and consistent grain that exudes a sense of simplicity and modernity.
Each type of wood brings its own personality to the table, allowing you to express your style and creativity through your craft.
Grain patterns, another essential aspect to take into account, add depth and texture to your serving platter. Whether you prefer the intricate swirls of burl wood or the straight, uniform lines of oak, the grain pattern can elevate the visual appeal of your piece.
As you begin the journey of designing your handcrafted wood serving platter, drawing inspiration from various sources can spark your creativity and elevate your craftsmanship.
When considering color combinations, think about the mood you want to convey. Earthy tones like deep browns and greens can bring a rustic charm, while bold contrasts like black and white can create a modern statement. You can also take cues from nature – the vibrant hues of a sunset, the calming shades of a forest, or the serene blues of the ocean can all serve as beautiful color inspirations for your platter.
Pattern inspirations can come from anywhere – from intricate tile designs to the simplicity of geometric shapes. Consider incorporating chevron stripes for a contemporary look, or maybe opt for a classic herringbone pattern for a touch of elegance.
Mixing and matching different patterns can also add a dynamic visual interest to your serving platter.
Don’t be afraid to experiment and let your creativity flow. Remember, the design of your serving platter is a reflection of your unique style and personality.
To craft exquisite wood serving platters, you’ll need essential tools like a saw, sander, and chisels for precision work.
Choosing the right types of wood is vital; opt for hardwoods like maple, cherry, or walnut for durability and a beautiful finish.
These tools and materials are the foundation for creating stunning, handcrafted serving platters that showcase your craftsmanship and artistic vision.
Crafting handcrafted wood serving platters requires a set of essential tools to guarantee precision and quality in your work. When working with wood, prioritizing tool safety is vital. Invest in high-quality tools with ergonomic designs to assure comfort during long crafting sessions.
Essential tools include a table saw for cutting the wood with precision, a power drill for creating holes or assembling pieces, and a sander for smoothing out rough edges. Additionally, having clamps on hand will help secure pieces together while the glue dries.
A combination square will aid in determining accurate measurements, while a chisel is essential for detailed carving work. Don’t forget to have a tape measure for precise dimensions and safety goggles to protect your eyes from wood particles.
When venturing into the world of crafting handcrafted wood serving platters, the choice of wood is a crucial element in achieving the desired aesthetic and functionality. Each type of wood brings its own unique characteristics to the table.
Maple and walnut offer a balance between durability and a rich, warm appearance. Oak is prized for its exceptional durability, making it an excellent choice for serving platters that will see frequent use. Cherry wood is renowned for its beautiful aesthetics, with its warm tones and fine grain adding a touch of elegance to your creations.
For those environmentally conscious crafters, bamboo is a sustainable option that’s both durable and attractive. If you’re looking to create something truly one-of-a-kind, consider using exotic woods that offer distinctive colors and grains, adding a touch of luxury to your serving platters.
Choose the wood that best suits your style and crafting needs to create stunning handcrafted serving platters that will be treasured for years to come.
To begin preparing the wood surface for your handcrafted serving platter, start by sanding the wood to achieve a smooth texture.
This step is essential in ensuring a flawless finish and enhancing the natural beauty of the wood grain.
Once sanded, sealing the surface won’t just protect the wood from moisture and stains but also bring out its rich colors and unique characteristics.
For a flawless finish on your handcrafted wood serving platters, achieving smoothness through sanding is an essential step in the preparation process.
Begin with a coarser grit sandpaper, around 80-100, to remove any rough spots, imperfections, or old finishes on the wood. Always sand in the direction of the wood grain to prevent scratches and maintain a consistent look.
Gradually progress to finer grit sandpapers, such as 150, 220, and even 320, to achieve a silky smooth surface.
When sanding, pay close attention to detail, ensuring all areas are equally treated. Be patient and thorough, as this meticulous process will greatly impact the final appearance of your serving platter.
Feel the wood under your fingertips as you sand, aiming for a uniform texture across the entire surface.
Smooth shifts between different grits will result in a professional-looking finish that invites admiration.
As you move forward in the process of perfecting your handcrafted wood serving platters, the next step is preparing the wood surface for sealing, ensuring long-lasting protection and enhancing the natural beauty of the wood.
To achieve the best results, consider the following:
Consider experimenting with different finish options to find the perfect match for your style and functionality needs.
Choose a sealing method that not only protects the wood but also showcases its unique grain patterns and colors for a truly stunning end result.
Crafting handcrafted wood serving platters requires precise cutting and shaping techniques that elevate the quality and aesthetic appeal of the final product.
When it comes to carving techniques, selecting the right tools is vital. Begin by outlining the shape of your platter on the wood surface, then carefully carve along these lines using a sharp chisel or carving knife. Pay close attention to the depth of your cuts to achieve a smooth and even surface.
After carving the basic shape of your platter, focus on edge finishing. This step is essential for creating a polished look. Use a router or sandpaper to round off the edges, giving them a smooth and professional appearance. Be sure to sand in the direction of the wood grain to prevent splintering and achieve a seamless finish.
To add a personal touch to your serving platter, consider incorporating unique design elements during the shaping process. Whether it’s adding intricate patterns or decorative handles, these details can make your platter stand out and reflect your artistic style.
With the basic shape of your wood serving platter carved and edges smoothed, the next vital step is sanding and smoothing the entire surface to achieve a flawless finish. This process is essential in creating a professional-looking piece that will be both functional and aesthetically pleasing.
To accomplish this, follow these key steps:
For a truly exquisite final touch on your handcrafted wood serving platter, the application of a food-safe finish is paramount. When it comes to food-safe options, consider using finishes like mineral oil, beeswax, or shellac. These options are non-toxic and safe for direct contact with food, guaranteeing the health and safety of your loved ones.
Before applying any finish, verify your serving platter is completely clean and dry. Use a clean cloth to apply the chosen finish in thin, even layers, following the wood grain for a smooth and uniform look. Allow each layer to dry thoroughly before applying the next one to achieve a durable and long-lasting finish.
If you desire a glossy and protective finish, consider applying varnish. Varnish provides a hard, water-resistant coating that enhances the natural beauty of the wood while protecting it from moisture and food stains.
When applying varnish, use a high-quality brush and apply thin coats, allowing each layer to dry completely before sanding lightly for a smooth finish.
Enhancing the visual appeal of your handcrafted wood serving platter can be achieved by skillfully incorporating decorative elements. By adding intricate details, you can elevate the charm of your creation and make it truly unique.
Here are some tips to help you add decorative elements to your wood serving platter:
Proper maintenance and care are vital for preserving the beauty and longevity of your handcrafted wood serving platter. To guarantee your platter remains in top condition, it’s critical to follow specific cleaning techniques and longevity tips.
When it comes to cleaning your wood serving platter, always hand wash it with mild soap and warm water. Avoid soaking the platter or putting it in the dishwasher, as this can cause warping or cracking.
After washing, make sure to dry the platter thoroughly with a clean cloth to prevent any water damage.
To maintain the luster of your wood serving platter, regularly apply a food-safe mineral oil or beeswax finish. This will help nourish the wood and protect it from drying out or developing cracks.
Simply rub a small amount of oil or wax onto the surface of the platter, let it sit for a few minutes, and then wipe off any excess.
Additionally, it’s vital to store your wood serving platter in a cool, dry place away from direct sunlight or heat sources. This will help prevent the wood from drying out or becoming discolored over time.
Now that you’ve crafted your own handcrafted wood serving platter, you may be wondering if it’s worth all the effort. But remember, the satisfaction of creating something unique and personalized far outweighs any challenges you may have faced. Plus, the beauty and functionality of your finished piece will be sure to impress your guests and elevate your dining experience. So go ahead, showcase your creativity and craftsmanship with pride!
